
Games consoles can be a great distraction, for parents and their kids. YouTube and Facebook are full of videos of dancing or party games. One of the best consoles for getting people together is the Nintendo Switch. But you might want to get the Nintendo Switch Parental Controls app as well.
The unique selling point of the Switch is it’s also a handheld console that connects to your TV. Console’s physically connected to the TV can be controlled by turning the TV off. We found the Switch got lifted off its base and secretly taken upstairs, often at bed time. So we had no idea what they’re playing, who their playing with and how long they are playing for. Sometimes we had no idea that it was even being played.
What’s the problem?
We think quiet kids are happy kids, right? Our problem wasn’t always whilst our son was playing on the Switch, but when we needed him to stop. First we had to get him to actually put the thing down. Sometimes this ended in us shouting. But it always resulted in a stroppy child, often with slamming doors. Studies have shown that there is a risk of addiction to gaming due to the neural rewards that games offer, hence the change in behaviour when the game is turned off after long periods of play.
We weren’t so worried about the type of games that our son was playing or the content, since we bought the Switch games that he plays and we made sure that they were all age appropriate. But it is something that you should definitely be careful of when buying games.
Other Gamers
As well as the content of the game, you should also know whether the game lets your child communicate with other players in the game. A survey in 2018 revealed that the average age of a UK gamer was 43. That’s probably older that you thought, so you may like to take a bit more notice of who your children are communicating with whilst in games.
It’s not possible for us to be there, monitoring the Switch activity all of the time. We also felt that we should give our kids some room for independence. What we needed was the ability to set limits to what our kids can access, so we have a better idea of what they’re experiencing. Then we can increase their exposure to it as they get older and gain more experience. This way our young people learn how to deal with the challenges that an online gaming life presents in a managed way.
Switch Parental Controls app
As it turns out, Nintendo have a solution to help with all of the problems discussed. They have produced an app, available on both the App Store and Google Play, that lets you regain control. It’s called Switch Parental Controls.
Here’s how to set it up.
Note: Throughout this process, you may receive several emails confirming the actions that have been carried out.
Step 1
Download the app.

Step 2
You will need a Nintendo account. You may have already set this up when you first turned on the Switch. If not, you can create an account when you start the app. You will also need to make sure that one of the users on the Switch linked to this Nintendo account.
Nintendo Account policy (the important bits)
Users have to be aged 16 or older.
Users aged 18 or older can create and add up to five Nintendo accounts for children (aged 17 and under).
A Nintendo account can be linked to a Nintendo Network ID.
If you’re 16 or older, the Nintendo account can also be linked to Facebook, Twitter and Google accounts.
For more information about creating a Nintendo account, visit the official Nintendo support page.
Step 3
Once you open the app, you will be directed to the Nintendo website in order to log into your account.
Step 4
After you have logged in, you will be asked to select the person to link the Nintendo account with the app.
Step 5
You then need to link the app to the Switch console itself. You will be given a registration code and instructions in the app.
Nintendo Switch Parental Controls app instructions
Turn on the Switch.
Press the Home button (the lowest button on the left hand controller).
Select the System Settings on the Home menu.
Select Parental Controls, the Parental Controls Settings.
The Switch now tells you to download the app, but there’s a option if you’ve already got the app open.
You then need to enter the registration code that the app showed you.
Once it’s verified, you can confirm that you want to link the app to the console.
Step 6
The first thing the app asked you after it’s linked, is if you want to set Play Time. This allows you to set a daily time limit.
Step 7
Pick a time (you can change it later if you need to), and click next.
Step 8
You can then choose the age restriction you need. Nintendo have three predefined levels: Teen, Child and Young child. There is also a custom setting if you want to make more adjustments.
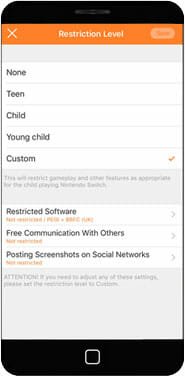
These settings change:
- which PEGI ratings your kids can play,
- whether the screenshots and videos can be posted on Social Networks,
- whether communication with other users (online) is allowed
- and whether VR mode is enabled on supported content.
Step 9
Once you’ve made your choice, tap on ‘Complete’, and you’re done!
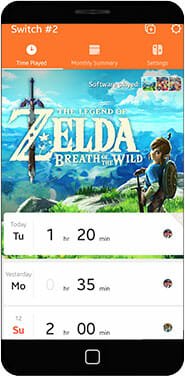
The app lets you see how much time has been played on the Switch, and on which games. You also get a monthly summary of activity on the Switch.
Changing your mind
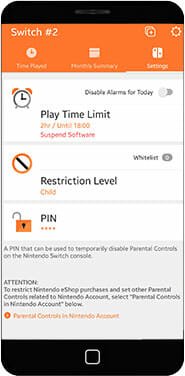
If you change your mind about the restriction level or the amount of time you’re allowing, then you can edit these on the Settings page.
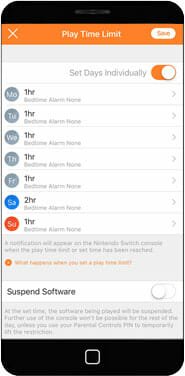
The Play Time Limit option lets to change the amount of time allowed. You can also choose to set it differently for different days and set a bedtime, after which the Switch can only be used with a PIN (I’ll explain that in a bit). The key option on this page of the app is the Suspend Software option, which is turned OFF by default. This option stops any games that are running when the play limit or the bedtime is reached. Further use of the console won’t be possible for the rest of the day, unless the PIN is used. The Play Time limit goes up in 15 minute intervals from 15 minutes to 6 hours, and there is also a ‘Not restricted’ option.
Make sure you tap the tick icon in the bottom right of the app screen after making any changes so that they are synced with the Switch.
Setting a PIN
The third option on this screen specifies a PIN. This is useful if you want to temporarily lift the restrictions or play time limit (like if you’re playing) or if you wish to give your kids more time on a particular day. Here how we’ve used it:
Our son plays a game and uses the 30 minutes of play time set by the app. However, on this occasion it’s okay if he plays some more. Once the 30 minutes is up, it locks, so he can’t play any more. He brings me the Switch so I can enter the PIN. Once the PIN is entered, the time limit is lifted for the rest of the day, or until the Switch gets turned off or put into stand by.
On another day, he had an hour to play, but got proper upset when we asked him to turn if off before the hour was up. In that situation, I used the app to reduce the play time limit so that it turned off almost immediately.
Hot tip!
By default, the PIN is entered using one of the control sticks on the Switch. I’ve found that some of diagonals can be a bit tricky to get first time. You can change to a keypad input system by pressing the ‘+’ button on the right hand controller. You can use the control stick or just tap on the numbers on the screen to select them. However, you do it that way, don’t let your kid see the code!
If your delightful young person tries to enter the PIN and they are unsuccessful, you will receive an email within a couple of minutes alerting you to the fact. You also get an email if you get it wrong as well.
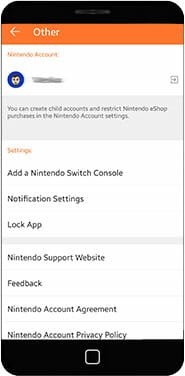
Further protection
If you are worried that your kids might access the Switch Parental control app on your phone and adjust the settings without you knowing, there is an option to lock the app using biometrics (finger print or facial recognition), if your phone supports this. To turn this feature on tap the circular cog icon in the top right hand corner of the app screen, then choose the Lock App option, then tap the button to turn it on.
All in all the Nintendo Switch Parental Controls app is a simple to use, straight-forward way of regaining some control over one aspect of your kid’s digital life. Allowing parents to set time limits, and restrict content and online communications.
What are your experiences with the Nintendo Switch? How has the app helped you?